What File Format Should You Deliver With Your Etsy Digital Print? A Buyer-Friendly Guide Sellers Can Link From Their Listings

If you sell digital prints on Etsy, file formats are probably not the part of your business you spend a lot of time thinking about. You pick a format, upload the file, and move on. But here is the thing: file format confusion is one of the most common reasons buyers leave negative reviews, open cases, or ask for refunds on digital listings.
They download a PDF and do not know how to open it. They get a JPG and wonder why it looks pixelated when they print it large. They have no idea what DPI means or why it matters, and your listing did not explain it.
This guide is designed to solve all of that. You can use it yourself to make smarter decisions about what to deliver, and you can link directly to it from your Etsy listings so buyers arrive already educated. Less confusion means fewer messages, fewer disputes, and a better reputation for your shop.
Let's get into it.
Understanding Why File Format Matters More Than You Think
When a buyer purchases a physical product, they receive something tangible. When they buy a digital print, they receive a file, and suddenly they are responsible for printing it themselves. That is a big leap for a lot of people, especially buyers who are not particularly tech-savvy.
The format you choose determines how easy or hard that experience will be.
The Buyer Experience Starts at Download
Most Etsy buyers who purchase digital prints are not designers. They might be decorating a nursery, creating a gallery wall, or looking for an affordable alternative to framed art. They know what they want it to look like on their wall, but they may have no idea what a vector file is or why a 300 DPI resolution matters for printing.
When they download your file and it does not behave the way they expect, they come back to you. That message in your inbox that says "I downloaded the file but it looks blurry" or "I do not know how to open this" is almost always a format or resolution issue that could have been prevented.
The format you choose, combined with how well you explain it, is the difference between a smooth transaction and a support headache.
How Format Confusion Leads to Refund Requests
Etsy's policies on digital downloads are clear: because the buyer can technically access the file, refunds are not automatically granted. But that does not mean disputes do not happen. A buyer who feels confused or misled will leave a one-star review and complain that the product did not work, even if the fault is actually a mismatch between the file format and their local print shop's requirements.
If your listing image shows a beautiful framed print on a white wall and your buyer has no idea that they need to go to a print shop or upload the file to a printing service, they are going to be frustrated. Clarity in your listing, especially around file format and how to use it, prevents almost all of that friction. This connects directly to a broader problem worth being aware of: the way your mockup images represent the product sets expectations that your file delivery either meets or disappoints.
Takeaway: Think of your file format choice as part of the product experience, not just a technical detail. The right format, clearly explained, dramatically reduces buyer confusion and protects your shop's reputation.
The Main File Formats and When to Use Each
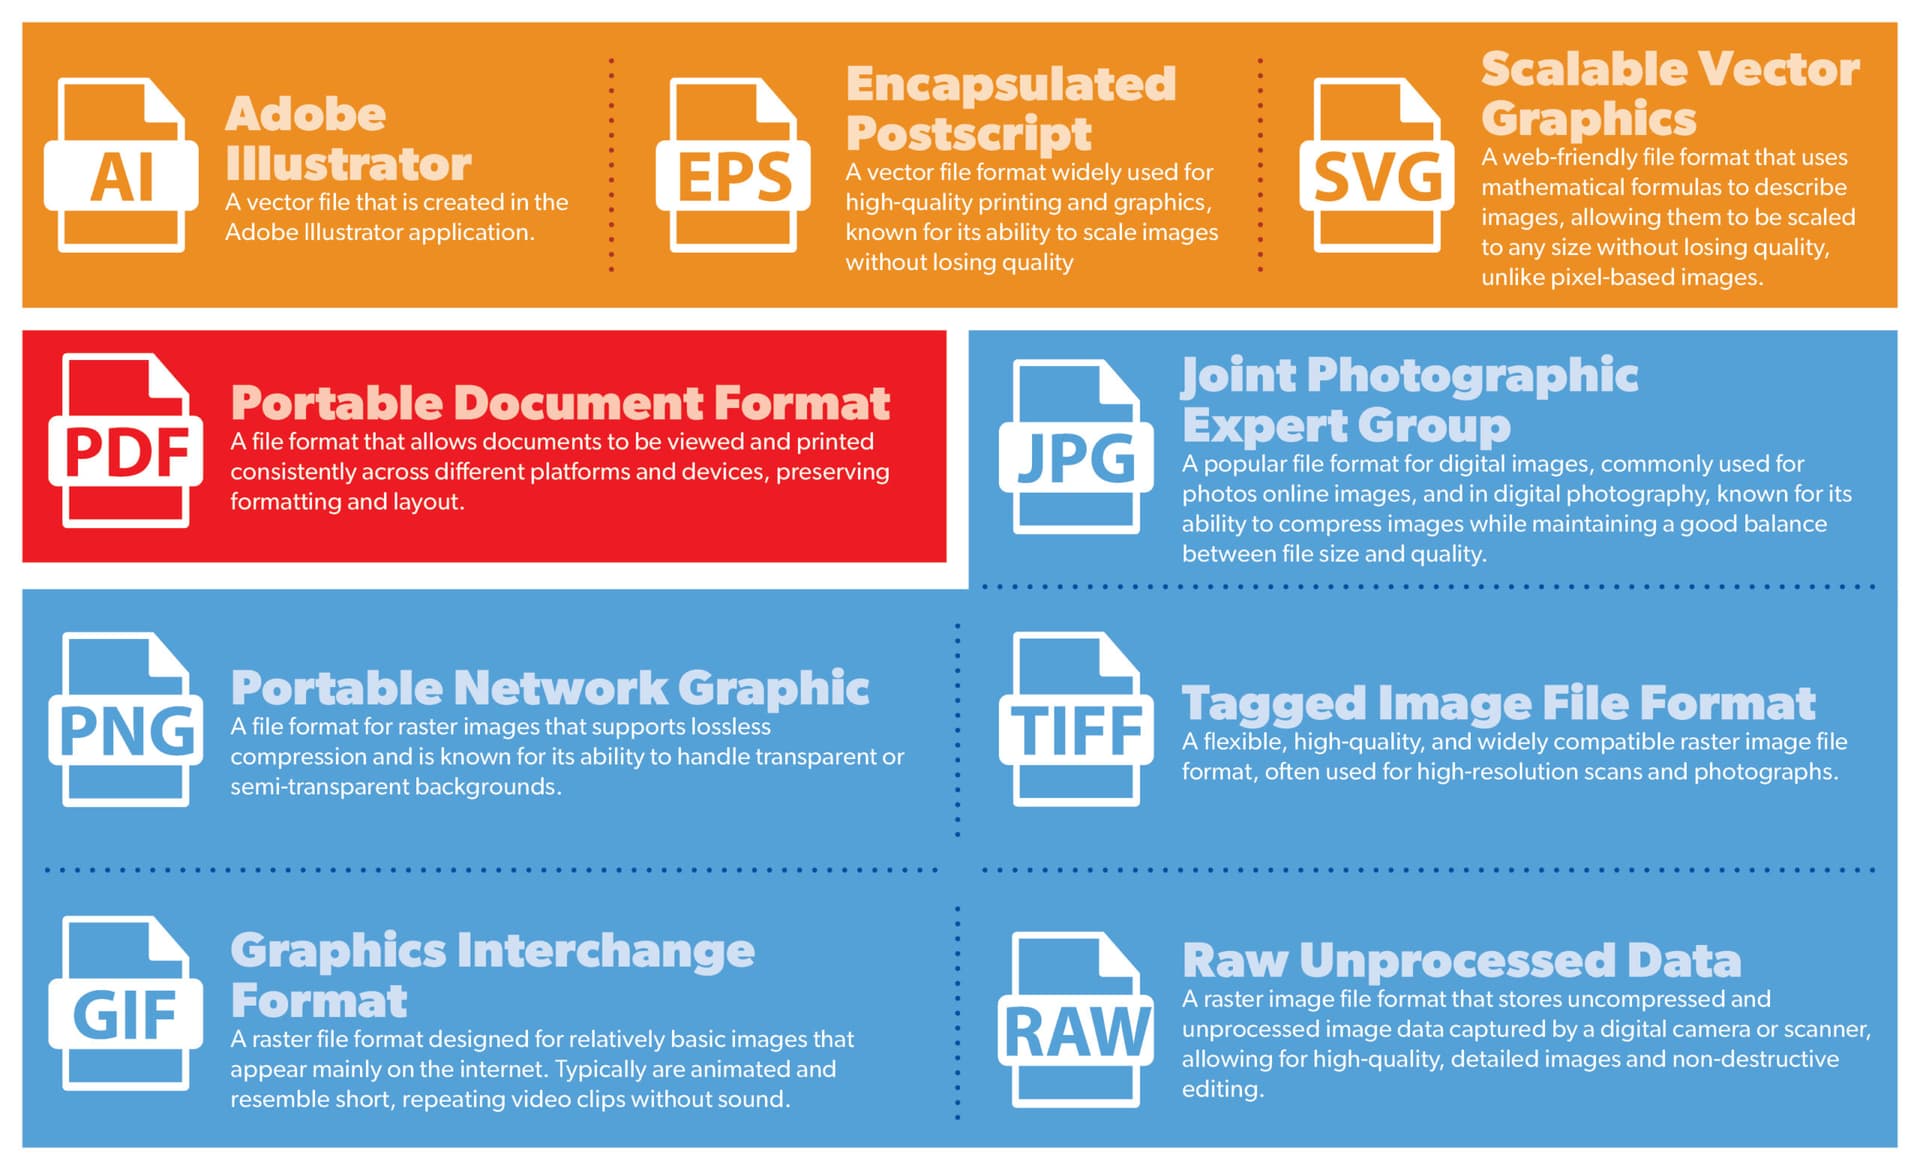
There are four formats that cover the vast majority of Etsy digital print deliveries: PDF, JPG, PNG, and SVG. Each has a specific use case and specific drawbacks. Here is what you need to know.
PDF: The Most Versatile for Home and Professional Printing
PDF is the format most professional print shops and home printers handle without any issues. When you export a PDF from a design tool like Adobe Illustrator, Affinity Designer, or even Canva, you can embed the full resolution image, preserve color profiles, and include bleed marks if needed.
For buyers who plan to print at a local print shop, PDF is usually the safest bet. Print shops request PDFs because the format preserves layout and resolution settings. A well-configured PDF also maintains color accuracy better than a compressed JPG.
Where PDF gets complicated is with home printers. A buyer using a basic inkjet at home might not know how to open a PDF in the right program, how to adjust print settings so the image fills the page correctly, or how to turn off automatic scaling. You will need clear instructions to go alongside it.
Best for: art prints, posters, quotes, and anything your buyer is likely to take to a print shop or upload to a printing service like Printful, Canva Print, or Walmart Photo.
JPG: Easy to Open, Easy to Print, But Watch the Compression
JPG (or JPEG) is the format most people are familiar with. It opens everywhere, from Windows Photo Viewer to iPhone Photos to the upload screen at Walgreens. For buyers who want the simplest possible experience, a high-quality JPG is often the least intimidating option.
The catch is compression. JPG uses lossy compression, which means every time you save a JPG, you lose a small amount of image data. If you export your original file as a high-quality JPG (quality setting 90 to 100 in most export dialogs), the output is fine for printing at standard sizes. If you save and re-save, or export at lower quality settings to reduce file size, the results will be noticeably degraded.
JPG also does not support transparency, so if your design has any transparent elements, like a logo watermark or a decorative border meant to sit on a colored background, JPG will fill that transparency with white.
Best for: photographic art prints, illustrations without transparency, and buyers who are printing at home or uploading to a consumer printing service.
PNG: When Transparency or Maximum Detail Matters
PNG is a lossless format, which means it does not compress your image data the way JPG does. That makes PNG files larger, but it also means every pixel is preserved exactly as you intended.
The main reason to choose PNG over JPG is transparency. If your design has cut-out elements, a transparent background, or overlapping graphics where the background color needs to show through, PNG handles that correctly and JPG does not.
For digital prints that will be printed on paper and hung on a wall, transparency is rarely relevant. But for clip art sets, digital stickers, printable planner pages, or any file that buyers might use inside another design, PNG is essential.
The downside of PNG is file size. A high-resolution PNG suitable for large-format printing can easily be 50 to 100 MB or more, which can create issues with Etsy's upload limits and with buyers who have slow internet connections.
Best for: clip art, digital stickers, printable planners, and any design element with transparency.
SVG: Powerful for Crafters, Confusing for Everyone Else
SVG stands for Scalable Vector Graphics. Unlike the raster formats above, an SVG is made of mathematical paths rather than pixels. That means it scales to any size without any loss of quality, which makes it ideal for large-format printing or for use with cutting machines like Cricut and Silhouette.
The problem is that SVG files are almost exclusively useful to buyers who already know what they are doing. A buyer who downloads an SVG expecting to print it at home on their inkjet is going to have a bad time. SVG files do not open in standard image viewers, they require software like Inkscape, Illustrator, or a cutting machine's proprietary software, and they behave very differently from raster images.
If your target audience is crafters, SVG is a powerful format to offer. If your audience is general consumers buying art prints, skip it or offer it as an optional bonus file alongside a more accessible format.
Best for: cut files, craft-ready designs, large-format signage buyers, and savvy design-oriented customers.
Takeaway: There is no single best format for every digital print. Match the format to your buyer's intended use. When in doubt, offer both a PDF and a high-quality JPG and let buyers choose based on their print method.
Resolution, DPI, and What You Actually Need to Tell Buyers
This is where a lot of sellers gloss over the details and a lot of buyers get confused. DPI stands for dots per inch, and it describes how much detail is packed into every inch of your printed image. Higher DPI means sharper prints at larger sizes.
The 300 DPI Standard and Why It Exists
The professional printing standard is 300 DPI. At 300 DPI, a 10x10 inch image would be 3000x3000 pixels. That is enough resolution to produce a clean, sharp print that looks professional whether it comes off a home inkjet or a commercial press.
When you design your prints, always work at 300 DPI from the start. Scaling a low-resolution image up to 300 DPI after the fact does not add real detail. It just makes a blurry image larger and blurrier.
If a buyer asks why their print looks pixelated or soft, the answer is almost always one of two things: either the file was not 300 DPI to begin with, or the buyer's printer or print service scaled the image incorrectly.
What to Put in Your Listing About Resolution
You do not need to write a technical essay in your listing description. You just need to give buyers the three pieces of information they actually care about.
First, tell them the file resolution. Something like "3000x4000 pixels at 300 DPI, suitable for printing at 10x13 inches at full quality or smaller at even sharper results" tells them exactly what they are getting.
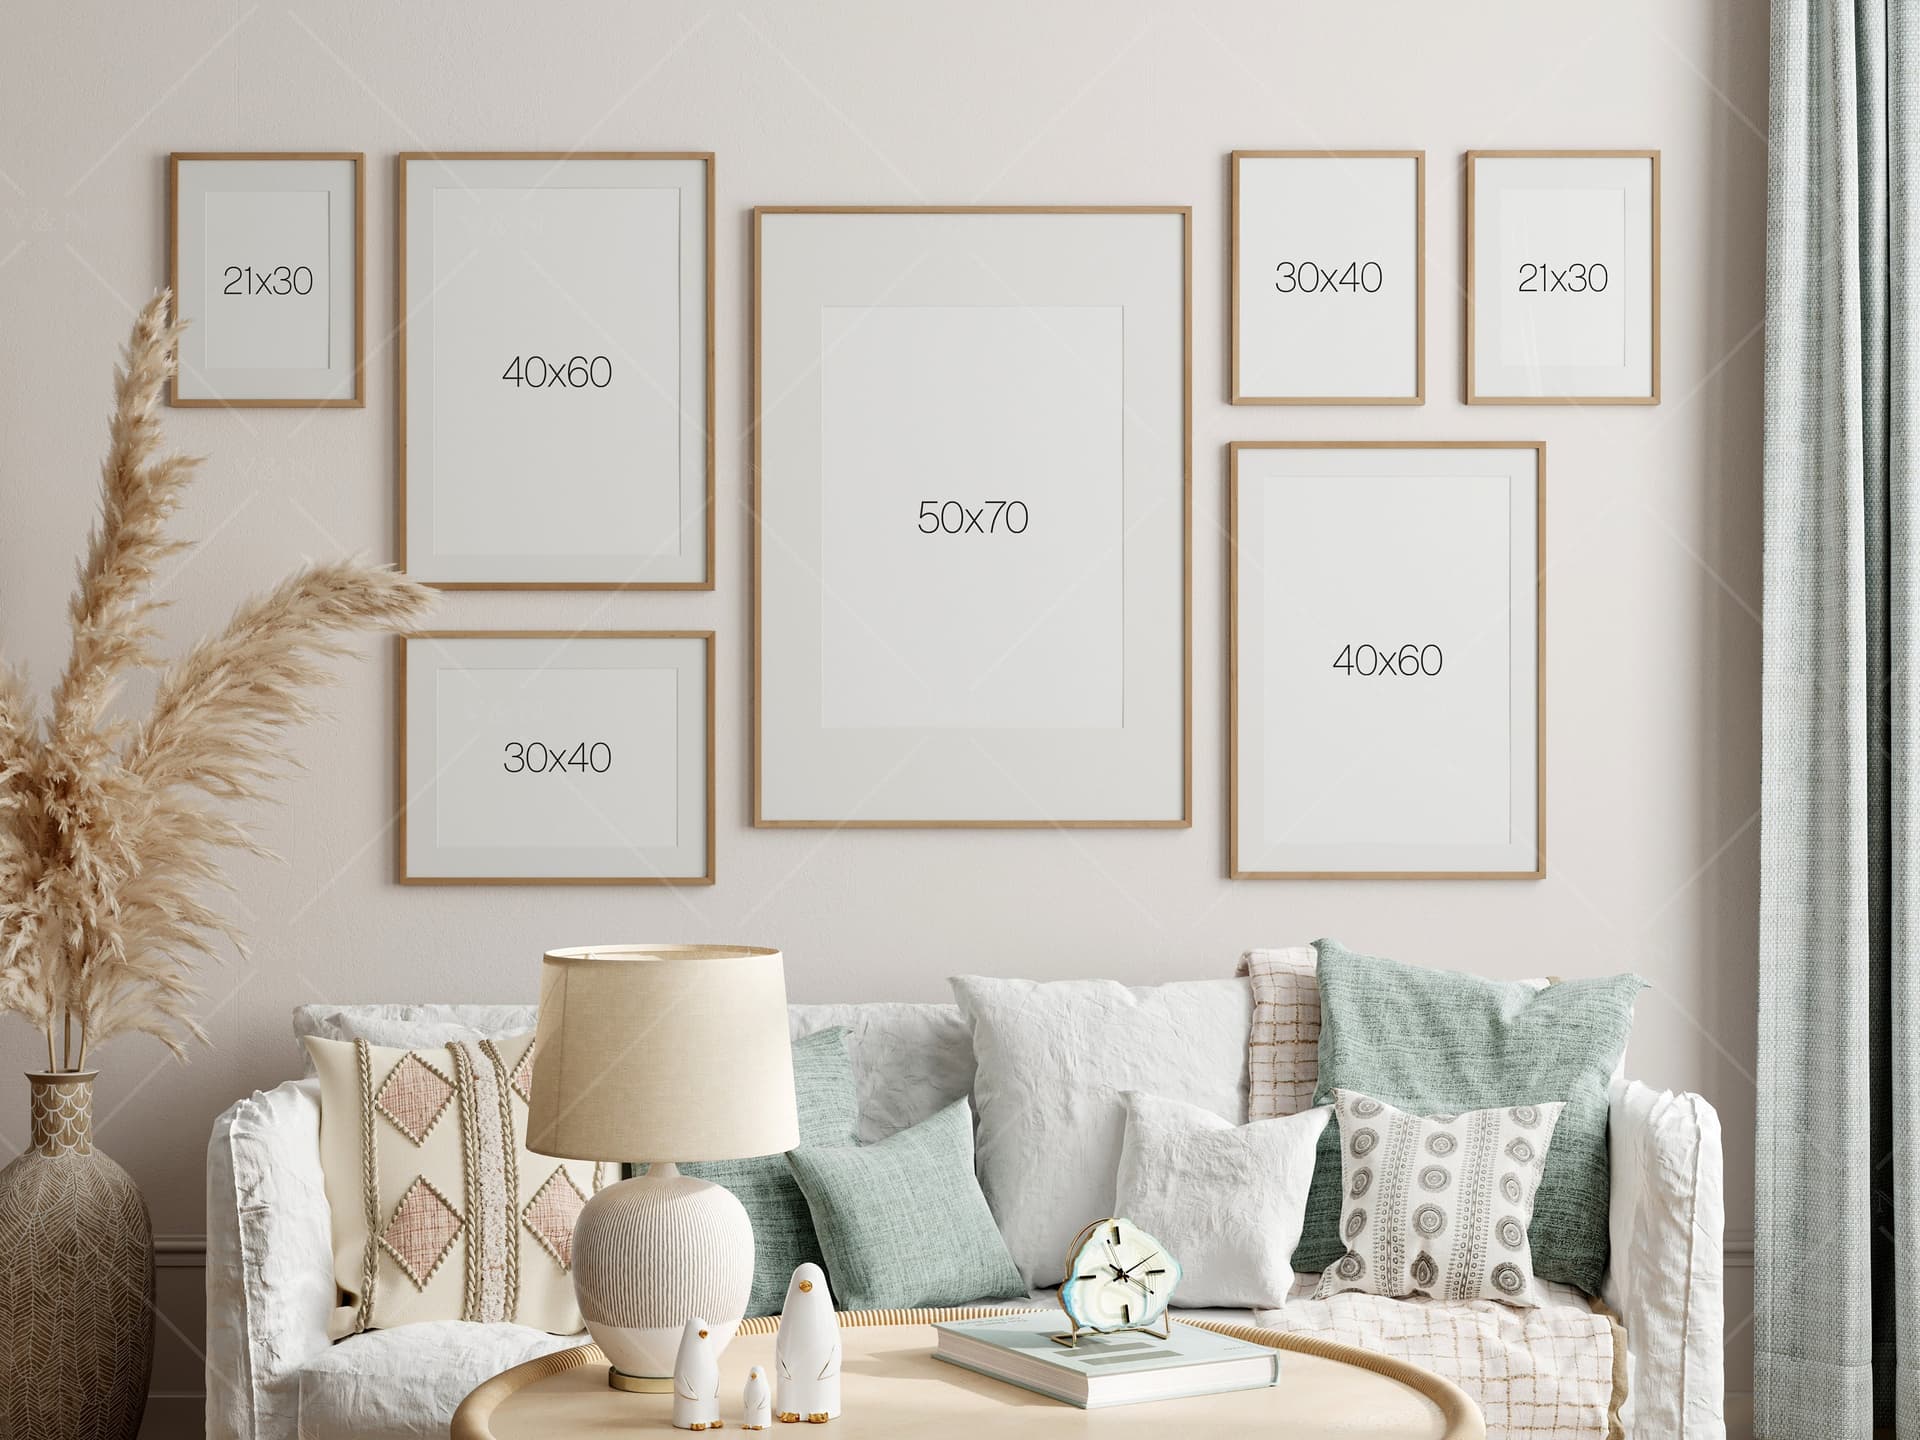
Second, tell them what sizes it will print well at. Buyers think in inches and centimeters, not pixels. Give them a list of sizes the file supports cleanly, like 5x7, 8x10, 11x14, and A4.
Third, tell them what to do. "Download the file and upload it to your local print shop, Walgreens Photo, CVS Photo, or an online service like Printful" is more useful than any amount of technical explanation.
Using text overlays on your mockup images to visually communicate the available print sizes is one of the most effective ways to set expectations before buyers even read the description.
Takeaway: Always design and export at 300 DPI. In your listing, translate the technical specs into plain-language size recommendations and clear instructions for how to actually print the file.
How Many Files Should You Include in One Listing
This is a question that comes up a lot, especially for sellers who offer multiple sizes or color variants within the same listing.
Bundling Multiple Sizes vs. Single-File Listings
Some sellers include every size in a single listing: 5x7, 8x10, 11x14, A4, A3, and so on. Others sell a single high-resolution file and let buyers scale it to the size they need. Both approaches work, and both have trade-offs.
Bundling multiple sizes is buyer-friendly. The buyer downloads exactly the file they need and hands it to the print shop without any resizing headaches. It is also a strong value signal because buyers feel like they are getting more.
The downside is Etsy's file size limits (20 MB per file, up to 5 files per listing) and the time it takes to create and manage multiple versions. If you are running a large catalog, that adds up fast.
A single high-resolution file works well if the file is genuinely large enough to cover the most common print sizes at 300 DPI. You just need to communicate clearly that the buyer can use it for multiple sizes, and ideally explain how.
Color Variants and Aspect Ratios
If you offer the same design in multiple colorways, you have a choice between separate listings or a bundle. Separate listings are better for Etsy search visibility because each listing targets slightly different search terms and gets its own set of images. Bundles are more convenient for buyers who want both.
Aspect ratio is a separate issue that trips up a lot of sellers. A 5x7 print and an 8x10 print do not have the same proportions, which means a file sized for one will leave white borders or get cropped when used for the other. If you promise multiple sizes, make sure you are either providing separate files for each aspect ratio or clearly explaining that minor cropping or borders may occur when printing at different ratios. The technical side of mockup aspect ratios is closely connected to this problem, because the proportions you show in your listing images shape what buyers expect when they go to print.
Takeaway: If you can manage the file count, providing separate files for each common print size reduces buyer confusion significantly. If you use a single file, be explicit about which sizes it supports and note any aspect ratio differences.
Writing the Buyer-Friendly File Information Section for Your Listing
Now that you know what to deliver, you need to communicate it clearly in your listing. A lot of sellers bury the file details at the bottom of a wall of text that buyers never read. Let's fix that.
The Format Your Description Should Follow
Start with what the buyer receives. Literally list the files: "You will receive one high-resolution JPG file (3000x4000 pixels, 300 DPI) and one print-ready PDF."
Next, list the sizes it prints well at: "This file prints beautifully at 5x7, 8x10, and 11x14 inches, as well as A4 and A3."
Then explain how to print it: "Download your file and upload it to your local print shop (Walgreens, CVS, Staples, FedEx Office) or an online printing service. Select the size you want and choose 'fit to page' if prompted."
Finally, add a note about colors: "Colors may vary slightly depending on your printer or print service. For the most accurate results, a professional print shop or online service will give better results than a home inkjet."
This takes about 80 words and answers almost every question a buyer will have before they ask it.
Creating a Linkable FAQ Page or Guide
One of the smartest things you can do as a digital print seller is create a standalone guide, like this one, that walks buyers through the entire process from download to print. You can then link to it from every listing in your shop using Etsy's listing description links.
This works because it keeps your listing descriptions clean and scannable while giving detail-oriented buyers exactly the information they need. It also positions you as a professional seller who has thought through the buyer experience, which builds trust and justifies your prices.
Your listing image strategy matters here too. The way you sequence your mockups and information images shapes whether a buyer reads the description at all. Listing image order plays a bigger role in buyer behavior than most sellers realize, and placing a clear "how to print" slide early in the sequence can reduce questions dramatically.
Takeaway: Write your file information section as a short, scannable block near the top of your listing description. Use plain language, avoid jargon, and tell buyers exactly what to do with the file once they download it.
Presenting Your Digital Prints Professionally Alongside the Technical Details
All of the file format clarity in the world will not help if your listing images do not look professional. Buyers make purchase decisions visually before they read a word of your description, so your mockups need to do the heavy lifting first.
Why Mockup Quality Affects How Buyers Perceive Your Files
There is a direct relationship between how professional your listing looks and how much confidence buyers have in the quality of your files. If your mockups look polished, buyers assume the files are high quality. If your mockups look rushed or low-resolution, buyers second-guess whether the download is worth the price.
This is not just an aesthetic argument. A buyer who trusts your listing is less likely to scrutinize the file format details and more likely to complete the purchase without questions. A buyer who is already uncertain about your listing will look for any reason to hesitate, and a confusing file format section gives them one.
Generating professional mockups quickly and consistently is something Mockupanda was built specifically to help with. If you are managing a catalog of dozens or hundreds of digital prints, manually creating mockups in design software for each one is not a realistic use of your time. A tool designed for print-on-demand and digital print sellers lets you create consistent, professional mockup images in bulk without design experience.
Keeping Your Listing Images Consistent Across Your Shop
Consistency across your shop reinforces your brand and makes your listings feel more trustworthy. When every listing uses the same mockup style, the same text overlay approach for communicating sizes, and the same thumbnail format, your shop looks like a professional operation rather than a collection of random uploads.
The number of mockup images you include per listing also matters. Too few and buyers do not have enough context. Too many and the most important images get buried. Getting that balance right, specifically for digital prints, is something worth thinking through carefully. The research on how many mockup images to include per listing points to a clear sweet spot that most sellers either overshoot or undershoot.
If you want to see how Mockupanda handles bulk mockup generation for Etsy digital print sellers, the best way is to explore the tool directly and see whether it fits your workflow.
Takeaway: Treat your mockup quality as inseparable from your file format communication. A professional-looking listing earns buyer trust before they ever read the description, which makes every other piece of your listing more effective.
Quick Reference: File Format Cheat Sheet for Etsy Digital Print Sellers
Here is a condensed version of everything above that you can use as a reference when setting up new listings.
Choosing Your Primary Format
For art prints, quotes, and posters going to a print shop: PDF at 300 DPI is your best primary format. Include a high-quality JPG as a secondary option for buyers using consumer printing services.
For photographic prints or illustrations without transparency: high-quality JPG at 300 DPI is simple, universally compatible, and opens on every device without any special software.
For clip art, stickers, planner pages, or anything with transparent elements: PNG at 300 DPI is non-negotiable. Do not use JPG for transparent files.
For craft files, cut files, or large-format signage: SVG is the right format, but only if your target audience already knows how to use it. Always clarify in your listing that SVG requires compatible software.
What to Include in Every Listing
A brief list of every file included in the download. The pixel dimensions and DPI of each file. The print sizes the file supports. A simple explanation of how to print it. A note about color variation between screens and printed output.
If your listing currently does not include all five of those things, that is where to start. It takes ten minutes to update a listing and it will reduce buyer questions for as long as the listing is live.
Takeaway: Keep this cheat sheet somewhere accessible and run every new listing through it before you publish. Consistent, complete file information is one of the lowest-effort, highest-impact improvements you can make to your Etsy shop.
Selling digital prints on Etsy is genuinely competitive, and the sellers who stand out are not always the ones with the most artistic talent. They are the ones who make the buying experience feel easy and trustworthy from the first click to the downloaded file. Getting your file formats right, explaining them clearly, and backing them up with professional listing images is a combination that compounds over time into better reviews, fewer refund requests, and a shop that buyers recommend to other people.
If you are ready to level up the visual side of your listings alongside the technical improvements, Mockupanda is worth a look. It was built by a product designer who ran into exactly the same friction you are dealing with now, and the whole point is to make professional mockup creation faster and less expensive for sellers who do not have a design team behind them.
Keep reading

How to Validate a New Wall Art Niche on Etsy Before You Create the Full Collection Using Mockup-Only Listings
How to Use Your Mockup Generator to Create Instagram Carousel Posts That Drive Traffic to Your Etsy Shop