
How to Use Shopify's Metafields to Display Print Size and Framing Info Alongside Your Mockup Images

If you sell wall art, digital prints, or framed pieces on Shopify, you already know that a great mockup image can make or break a sale. A well-styled photo of your print hanging above a linen sofa tells a story that a plain white background never could. But here is the thing: images alone leave buyers with questions. What size is that exactly? Does it come framed? What paper stock is this printed on? Can I get it in a 5x7?
When those questions go unanswered on the product page, buyers either message you (which slows everything down) or they leave and buy from someone who made it easier. Neither of those outcomes is good for your conversion rate.
Shopify metafields solve this problem cleanly. They let you store structured product data, things like print dimensions, framing options, paper weight, and care instructions, and then display that information anywhere on your product page using your theme's built-in tools or a small amount of Liquid customization. The result is a product page that pairs your beautiful mockup images with exactly the information a buyer needs to feel confident hitting "Add to Cart."
This guide walks you through the whole process, from understanding what metafields actually are to making them show up in exactly the right spot on your product pages.
What Shopify Metafields Are and Why They Matter for Print Sellers
Before you start clicking around in your Shopify admin, it helps to understand the concept. Metafields are custom data fields that Shopify lets you attach to products, variants, collections, or your store itself. Think of them as extra columns in a spreadsheet that only your products can see.
By default, a Shopify product has a title, description, price, and a handful of other standard fields. That is fine for most products. But for print-on-demand sellers, you often need to communicate a layer of detail that does not fit neatly into those boxes. You might have three different paper options, two framing styles, and five different sizes for a single design. Stuffing all of that into the product description turns it into a wall of text that most shoppers skip entirely.
Metafields let you separate that data from the description, store it cleanly, and then display it in a structured, readable format, like a spec table or a dedicated details section right under your mockup gallery.
The Difference Between Metafields and Variants
You might be wondering whether you should just use Shopify's variant system for size and framing options. Variants are great when you want the buyer to actively choose between options and the choice affects the price or SKU. If you sell an 8x10 print for $15 and a 16x20 for $30, those absolutely should be variants.
Metafields are different. They are informational rather than transactional. Use them to display the paper weight, whether a frame is included, the recommended hanging hardware, or the safe zone dimensions for a bleed print. A buyer does not select a metafield value. They read it. It is context that builds confidence, not a choice that changes what goes into the cart.
A well-set-up product page uses both: variants for selectable options that affect the order, and metafields for the supporting detail that helps the buyer understand exactly what they are getting.
Why This Is Especially Important Next to Mockup Images
Mockups do something powerful. They show the buyer not just what your print looks like, but how it feels in a real space. A well-made mockup of a botanical print in a simple oak frame, hanging in a bright Scandinavian living room, creates desire. It answers the emotional question: does this fit my home?
But desire is not enough on its own. Once a buyer is interested, they shift into evaluation mode. They want to know if the frame in the photo is actually included, what size the print in the mockup is, and whether they can get the same piece in a larger size for a different wall. If that information is buried three paragraphs into your product description, you are adding friction at exactly the wrong moment.
Displaying structured metafield data right below or beside your mockup gallery short-circuits that friction. The buyer sees the beautiful image, immediately sees the key specs, and moves forward.
Takeaway: Use variants for selectable options that change the order. Use metafields for informational details like paper stock, print dimensions, and framing specs. Together, they give buyers everything they need to buy with confidence.
Setting Up Your Metafield Definitions in Shopify Admin
Shopify added native metafield management to the admin a few years ago, which means you no longer need a third-party app just to create and manage custom fields. Here is how to get set up.
Creating Your Metafield Definitions
Head to your Shopify admin and go to Settings, then Custom Data, then Metafield Definitions. You will see options for different resource types. Since you are adding information to individual products, click on Products.
Click the "Add definition" button to create your first metafield. You will give it a name (which is what you see in the admin), a namespace and key (which is how the theme references it), and a content type (which tells Shopify what kind of data this field holds).
For a print seller, here are the metafield definitions worth creating right away:
Print dimensions: Name it "Print Dimensions," set the namespace/key to something like custom.print_dimensions, and use the Single line text type. You will fill this in as something like "8 x 10 inches" or "A3 (297 x 420mm)."
Framing details: Name it "Framing Details," use custom.framing_details, and Single line text. Values like "Unframed print only" or "Includes solid pine frame" work well here.
Paper stock: Name it "Paper Stock," use custom.paper_stock, and Single line text. Something like "200gsm matte fine art paper" gives buyers useful information.
Orientation: Name it "Orientation," use custom.orientation, and either Single line text or a List of choices if you want to constrain the options to Portrait, Landscape, and Square.
Hanging hardware: Name it "Hanging Hardware," use custom.hanging_hardware, and Single line text. Values like "Sawtooth hanger included" or "Hardware not included" answer a question buyers always have.
Once you have saved each definition, it will appear as an editable field on every product page in your admin.
Filling In Your Product Metafields
With your definitions created, open any product in your admin and scroll down to the Custom Metafields section near the bottom. You will see each of the fields you just defined, ready to fill in.
This is where the bulk work happens, especially if you have a large catalog. Take the time to fill in every relevant field for each product. Blank metafields do not display anything on the storefront, so incomplete data means a patchy product page.
If you have a lot of products to update, Shopify supports bulk editing through the Products list view. You can add your metafield columns to the bulk editor and fill them in row by row, which is much faster than opening each product individually.
Takeaway: Create a small set of focused metafield definitions that answer the questions buyers ask most often. Keep each field to a single, specific piece of information rather than combining multiple details into one field.
Displaying Metafields on Your Product Page
Creating and filling in metafields is only half the job. You need to actually show them on the storefront. Shopify gives you a few different ways to do this depending on your comfort level and your theme.
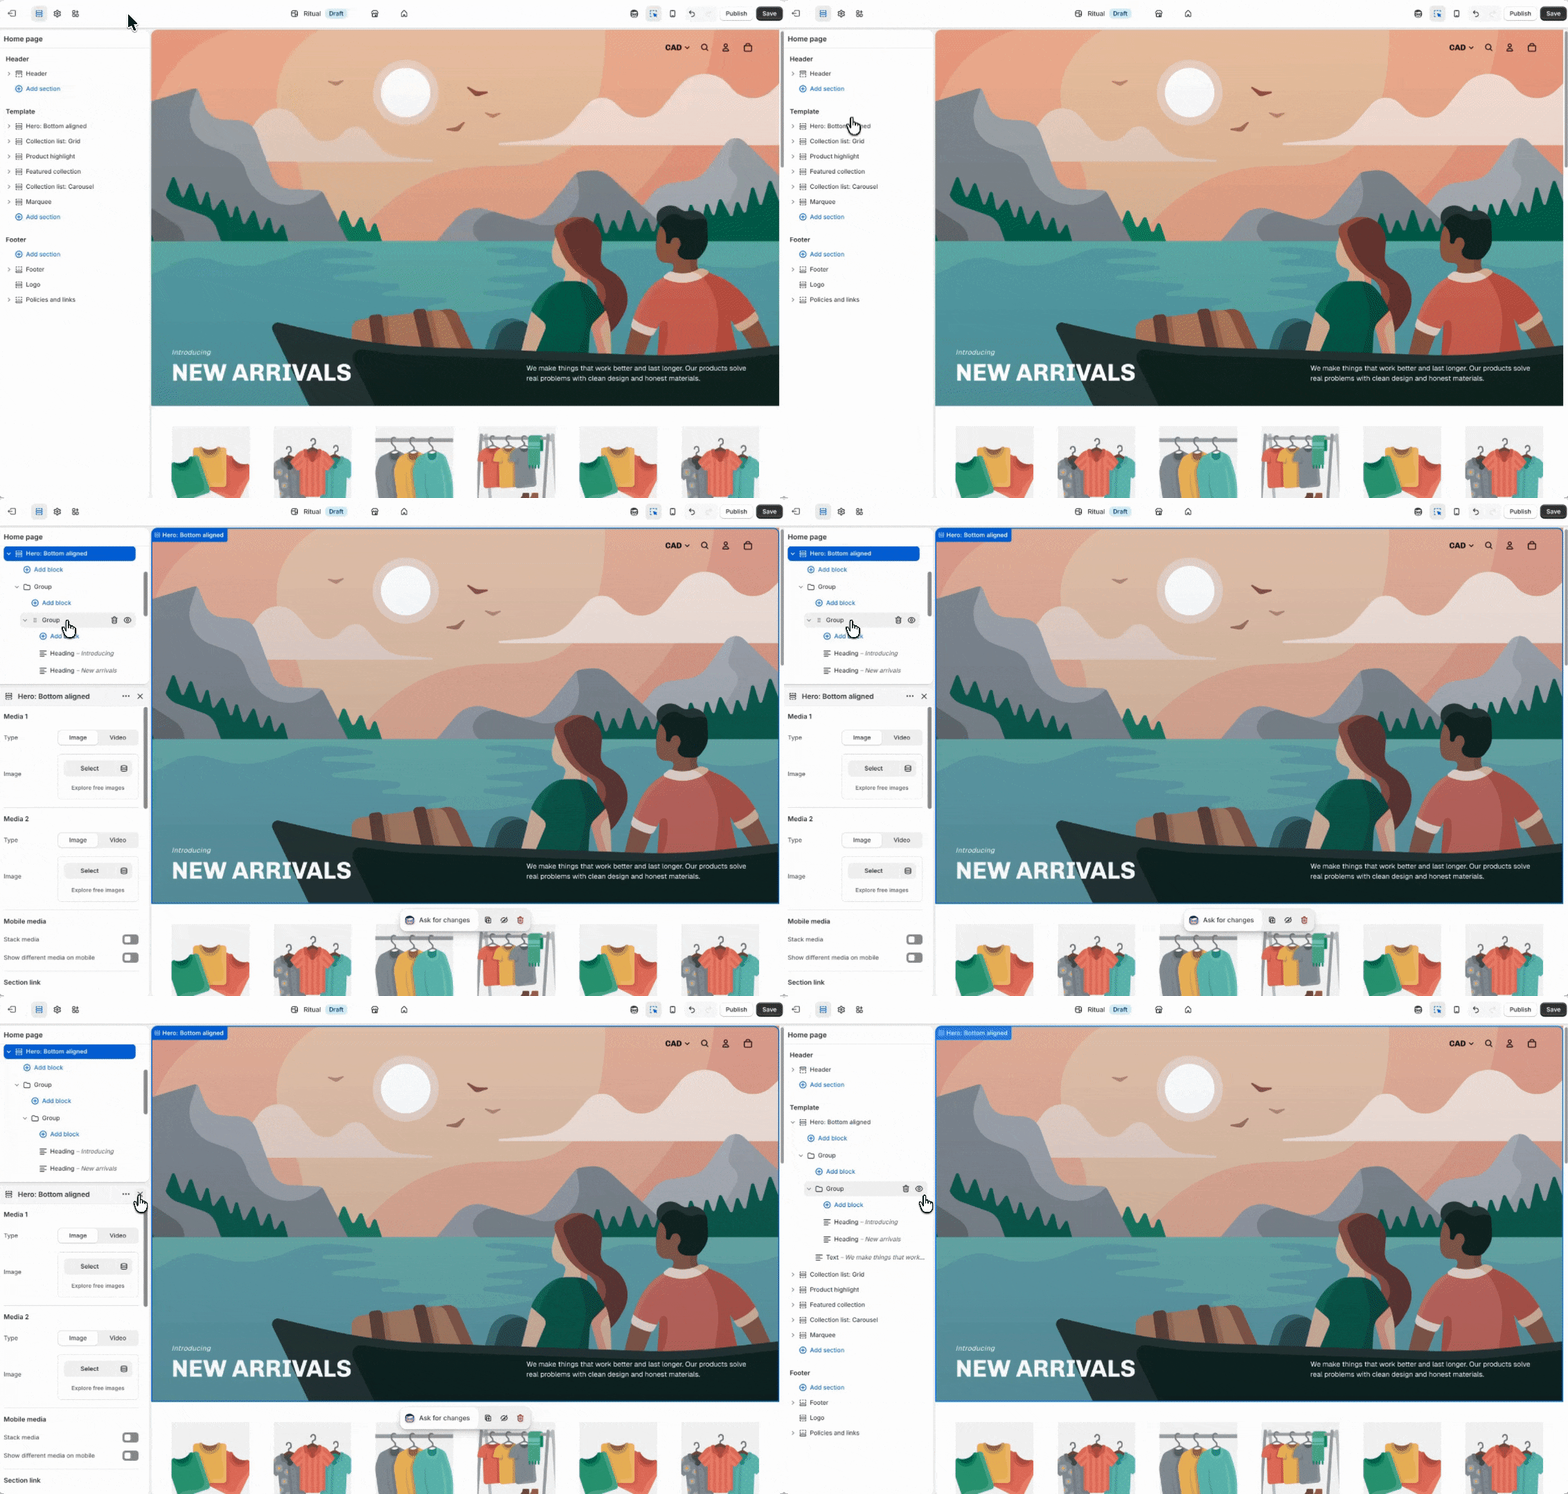
Using the Theme Editor (No Code Required)
If you are using a modern Shopify 2.0 theme like Dawn, Craft, or Sense, you can display metafields directly in the theme editor without touching any code. Open the theme editor, navigate to a product page template, and look for the option to add a new block or section.
Many 2.0 themes include a "Custom Liquid" block or a "Text" block that supports dynamic sources. When you add one of these blocks and click on it, you will see a "Connect dynamic source" option. Click that and you can link the block directly to one of your metafield definitions. Whatever you have stored in that metafield for a given product will display automatically on that product's page.
For a clean display, add one block per metafield and give each block a label. Position these blocks below your product gallery or in the column next to your Add to Cart button. That placement puts the spec information in view exactly when a buyer is evaluating whether to purchase.
Using Liquid Code for a Spec Table Layout
If your theme does not support dynamic sources in the editor, or if you want more control over the layout, you can add a small snippet of Liquid code to your product template. This sounds more technical than it is. You are essentially adding a few lines to tell Shopify to show certain metafield values in a specific format.
In your theme editor, go to Edit Code and open the product template file, usually called product.json or product-template.liquid depending on your theme. Find the section of the template where your product description is displayed, and add a block like this below it:
```liquid {% if product.metafields.custom.print_dimensions != blank %} <p><strong>Print Dimensions:</strong> {{ product.metafields.custom.print_dimensions.value }}</p> {% endif %} {% if product.metafields.custom.framing_details != blank %} <p><strong>Framing:</strong> {{ product.metafields.custom.framing_details.value }}</p> {% endif %} {% if product.metafields.custom.paper_stock != blank %} <p><strong>Paper Stock:</strong> {{ product.metafields.custom.paper_stock.value }}</p> {% endif %} ```
Wrap those in a simple table or a styled definition list if you want it to look more polished. The key is the conditional check: the block only renders if that metafield has a value, so products you have not fully filled out will not show empty labels.
Takeaway: Start with the theme editor if you are on a 2.0 theme. It takes about ten minutes to connect your metafields and get them displaying. Only go into the code if you need a specific layout the editor cannot give you.
Pairing Metafield Data With Your Mockup Strategy
Metafields and mockup images are most powerful when they work together as a system. Each mockup you create should correspond to specific metafield values, and the combination should tell a complete story.

Matching Mockup Styles to Size Variants
If you offer your print in multiple sizes, your mockup images should reflect that. A mockup of an 8x10 print hanging on a small gallery wall reads differently than a 24x36 statement piece above a sofa. When a buyer selects the 24x36 variant, they should ideally see a mockup that reflects that scale, and your metafields should update to show the corresponding dimensions and pricing context.
For Shopify sellers, you can attach different images to different variants so the gallery updates when a buyer switches sizes. Pair that with variant-specific metafields (you can create metafields at the variant level, not just the product level) and each size selection gives the buyer a tailored visual and a tailored set of specs.
Building these mockups consistently across a large catalog is where a tool like Mockupanda becomes genuinely useful. Rather than creating individual mockup images one at a time in Photoshop or Canva, you can process an entire collection in bulk, keeping the styling consistent and saving hours of repetitive work. When your mockups are consistent, the metafield data feels like a natural extension of the visual, not an afterthought.
Using Metafields to Support Your Pricing Story
One underused application of metafields is using them to reinforce your pricing. If you sell a fine art giclée print on 300gsm cotton rag paper, that is a premium product. But if that information is sitting in the middle of a dense description paragraph, most buyers will never register it.
A metafield that cleanly displays "300gsm cotton rag paper, archival inks, 100-year fade resistance" right next to a beautifully styled mockup does real work. It justifies the price before the buyer even thinks to question it. The mockup creates the desire. The metafield delivers the rationale. Together, they make a strong case for your price point.
This is the same principle behind professional product photography in physical retail. The environment communicates quality before a single word is read. Your mockup is the environment. Your metafields are the label.
Takeaway: Think of each product page as a pairing: the mockup creates emotional pull, and the metafield data provides the rational justification. Build both with equal care and your conversion rate will reflect it.
Managing Metafields at Scale
Once you have the system set up and working on a few products, the next challenge is keeping it consistent across your whole catalog, especially if you are regularly adding new designs.
Building a Metafield Template for New Products
Create a simple text document or spreadsheet that lists every metafield definition you use and your standard values for each. When you add a new print to your shop, you reference that document as a checklist before publishing.
For most print-on-demand sellers, many of the values are the same across products. Your paper stock does not change. Your framing setup is consistent. Only the dimensions and maybe the orientation change from design to design. Having a template means filling in metafields takes two minutes per product, not ten.
Using Shopify's Bulk Import for Large Catalogs
If you have an existing catalog of 50 or 100 products with no metafields filled in, doing them one by one is not realistic. Shopify lets you export your products as a CSV file, add your metafield values as additional columns in the spreadsheet, and import them back in bulk.
The metafield column headers follow a specific format in the CSV: you reference them as the namespace and key in the header row. Shopify's help documentation covers the exact syntax, and it is worth taking an hour to do this properly rather than spending days on manual data entry.
Once your catalog is fully populated, ongoing maintenance is minimal. New products get filled in at the time of listing, and you only revisit existing ones if something changes about your materials or offering.
Takeaway: Set up a simple template for your standard metafield values before you start filling in your catalog. It makes adding new products fast and keeps your data consistent across listings.
Common Mistakes to Avoid
Metafields are straightforward once you understand the system, but there are a few places where sellers consistently run into problems worth flagging before you get started.
Overloading Your Metafields With Too Much Information
It is tempting to create a metafield for every conceivable product attribute once you realize how easy it is. Resist that instinct. The goal is to surface the information that directly influences a buying decision, not to replicate your entire product specification sheet.
Ask yourself: would a buyer need to know this to feel confident purchasing? If the answer is no, it either belongs in the description or nowhere on the product page at all. More fields do not mean a better product page. Clarity means a better product page.
Forgetting to Test on Mobile
The majority of Etsy and Shopify browsing happens on phones. A metafield display that looks elegant on desktop can become cluttered or broken on a small screen depending on how your theme handles it. After you set up your metafield display, open the product page on your phone and check how it reads. Make sure the spec information is visible without scrolling past a wall of text, and that it appears close enough to the mockup images to feel connected.

Not Connecting Metafields to the Right Product Template
If your shop uses multiple product templates (one for framed prints, one for digital downloads, one for canvas wraps) make sure your metafield display code or theme block is applied to the correct templates. It is easy to set everything up on the default product template and then realize your framed prints use a different template and are not showing the data at all.
Check every template type in your theme editor and confirm that the metafield blocks are applied wherever relevant products live.
Takeaway: Keep your metafield setup focused and test it on mobile before considering it done. A clean, mobile-friendly display of four key specs beats a cluttered list of twelve every time.
Putting It All Together
Shopify metafields are one of those features that feel slightly technical on the surface but pay off quickly once you get them working. For print sellers specifically, the payoff is real: buyers who understand exactly what they are purchasing feel confident making the purchase. Fewer questions in your inbox. Fewer abandoned carts at the last moment. More conversions.
The process is simpler than it looks. Create your definitions in Settings. Fill in the values on each product. Connect them to your product template using the theme editor or a few lines of Liquid. Position them near your mockup gallery where buyers are most engaged. Then keep your mockup images strong enough to do the emotional work that the spec data alone cannot do.
If your mockup images are the piece of this equation that needs work, Mockupanda is built for exactly this situation. It handles bulk mockup generation for print-on-demand sellers, so you can maintain consistent, professional visuals across your entire catalog without spending half your week in Photoshop. Great mockups paired with clear metafield data is the combination that turns a product page into something that genuinely converts.
Start with one product. Get the metafields displaying cleanly next to your best mockup image. Then roll the same setup across your catalog. You will notice the difference.
Keep reading
The Batch Mockup Checklist Every Print-on-Demand Seller Needs Before a Holiday Sales Season

How to Use Batch Mockup Generation to Stay Consistent When You Have Multiple Designers Uploading New Artwork to Your Shop